You are here: Are Drone Roof Surveys Worth It? A Guide to Modern Roof Inspections
When it comes to inspecting roofs, traditional methods often mean time-consuming, costly, and sometimes dangerous work. But drones have brought a new option to the table, transforming the roof inspection industry. Here’s a look at why drone roof surveys are gaining popularity and whether they’re worth the investment for homeowners, real estate professionals, and roofing companies alike.

Figure 1. Image from an industrial roof survey
What is a Drone Roof Survey?
A drone roof survey uses high-quality drones equipped with cameras, thermal imaging, and other sensors to assess the condition of a roof. These drones capture aerial footage and images, allowing inspectors to evaluate hard-to-reach areas safely, quickly, and efficiently. From damaged shingles to potential leaks, drones provide a comprehensive overview that is often more detailed than a traditional roof inspection.
Key Benefits of Drone Roof Surveys
- Safety and Accessibility: Roof inspections can be risky for inspectors, especially on tall, steep, or older structures. Drones eliminate the need for ladders and scaffolding, allowing surveyors to perform inspections from the ground. This ensures safety for the inspection crew and reduces liability concerns for homeowners and businesses.
- Time Efficiency: Traditional roof inspections can take several hours to complete, especially on large buildings or homes with complex roof structures. Drones can scan an entire roof in minutes, making the process more efficient and less intrusive.
- Cost-Effectiveness: While there’s an upfront cost for drone services, they often save on labour and equipment rentals. For larger properties, using a drone can be especially economical. Many companies also offer competitive pricing on drone inspections, making it more affordable than traditional methods.
- Detailed and Accurate Data: Equipped with high-resolution cameras, drones provide precise images and videos, capturing even small issues that might go unnoticed by the human eye. Some drones offer thermal imaging to detect heat loss or moisture, revealing potential leaks that may otherwise go unnoticed. These details help property owners make informed decisions about repairs or replacements.
Applications of Drone Roof Surveys
- Homeowners: Drones provide a quick way to identify wear and tear, storm damage, or leaks, helping homeowners address small issues before they become costly repairs.
- Property Professionals: Surveyors, Architects, Structural Engineers and property managers benefit from drone surveys by offering potential buyers and developers the opportunity to appraise the roofs condition without putting a foot on the roof.
- Roofing Contractors: Roofing companies can quickly assess project requirements and give clients a clear, detailed estimate based on the condition of the roof, increasing efficiency and client satisfaction.
- Insurance Claims: After extreme weather events, insurance companies use drone surveys to evaluate damage claims accurately and expediently.
Potential Drawbacks of Drone Roof Surveys
Limitations of Survey: The main drawback is not having boots on the roof where you can probe and delve deeper into the roofs structure, you can’t lift slates, tiles, use rulers or other surveying equipment to check on the quality of seals and unless you go into the loft you won’t fully understand how the roof has been formed.
Weather Dependency: Drones are vulnerable to poor weather conditions like heavy rain or high winds, which may delay inspections or reduce image quality. We all love some sunlight and its good for us, but not too much please as it can cast shadow, and typically this will occur when the most critical watertight detail is!
Legal and Privacy Concerns: Drones are subject to regulations, and some areas restrict their use due to privacy or security concerns especially around prisons. It’s crucial to hire a CAA certified drone operator who is familiar with local regulations.
Initial Investment for Providers: Roofing companies looking to integrate drones into their services need to invest in equipment, training, and licensing, which can be a hurdle for smaller businesses.
Are Drone Roof Surveys Worth the Investment?
For most situations, drone roof surveys are absolutely worth it. They provide clear benefits in terms of safety, accuracy, and efficiency, often at a lower cost than traditional inspections. Homeowners get the peace of mind of an accurate assessment, while businesses and inspectors benefit from saved time and reduced risk.
For anyone needing a roof inspection, drone surveys are an excellent modern solution that delivers thorough results, lower risk, and often faster turnaround times. As drone technology continues to improve, we can expect drone roof surveys to become the go-to method for roof inspections.
What Drones are Suitable for Roof Surveys?
We use a mixture of drones:
- A DJI Mini 4 Pro (approx. £1000.00) as these can be flown by almost anyone and can almost be flown anywhere, but only offers 3 x zoom, so you have to get close to the roof to get really detailed imagery. These are only 249g and are the ideal choice for the surveyor’s tool kit. These drones, which are under 250g can be flown with no minimum horizontal distance from “uninvolved people”, which make them a good option for anyone with little training.
- We also utilise a DJI Mavic 3 Pro (£2000.00 - £2750.00), and this is a heavier drone and weighs nearly 1kg, but at this point the regulations do get more complicated, as you have to keep at least 50 metres away from uninvolved people except when landing and then it is down to 30 metres. To fly this drone in residential areas you would need the minimum of an A2 COFC qualification and suitable aviation insurance. So, you may ask, why do we have this drone in our collection? quite simply its level of zoom (see images 2 and 3).
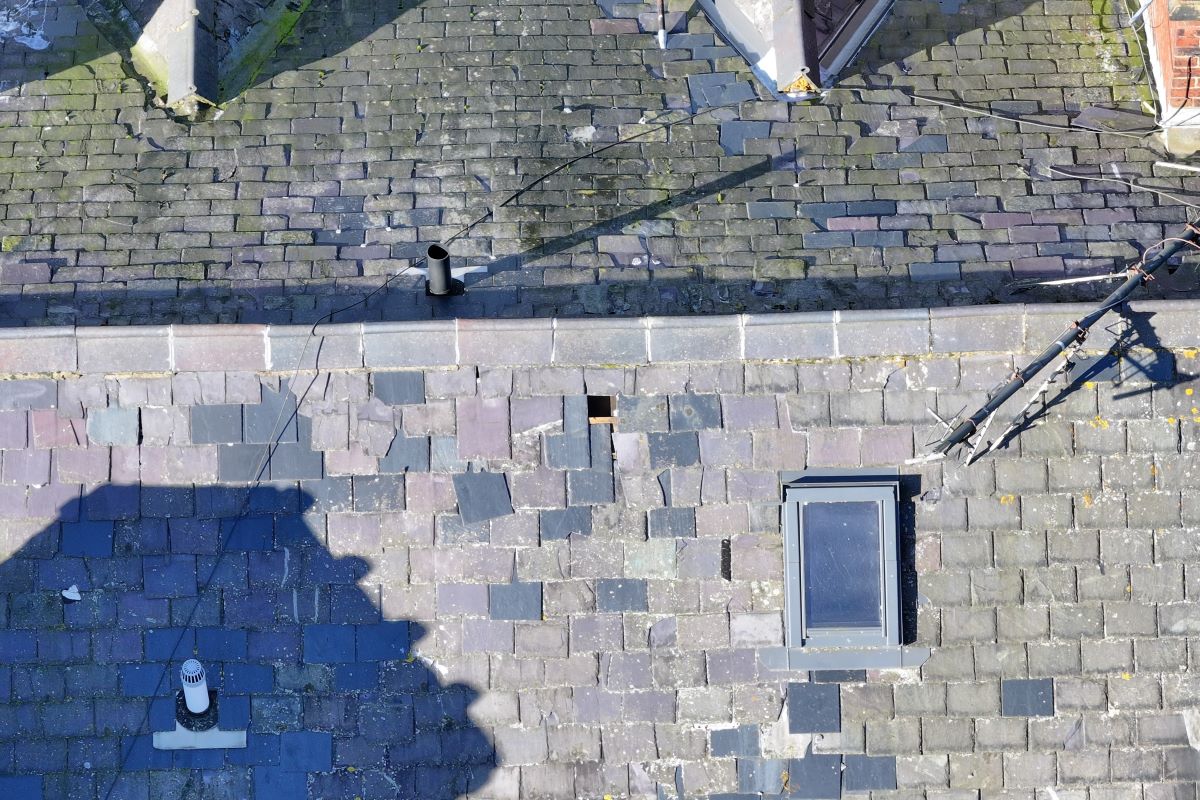
Figure 2. Image of grey slate roof at 50 metres in height. Zoom x2
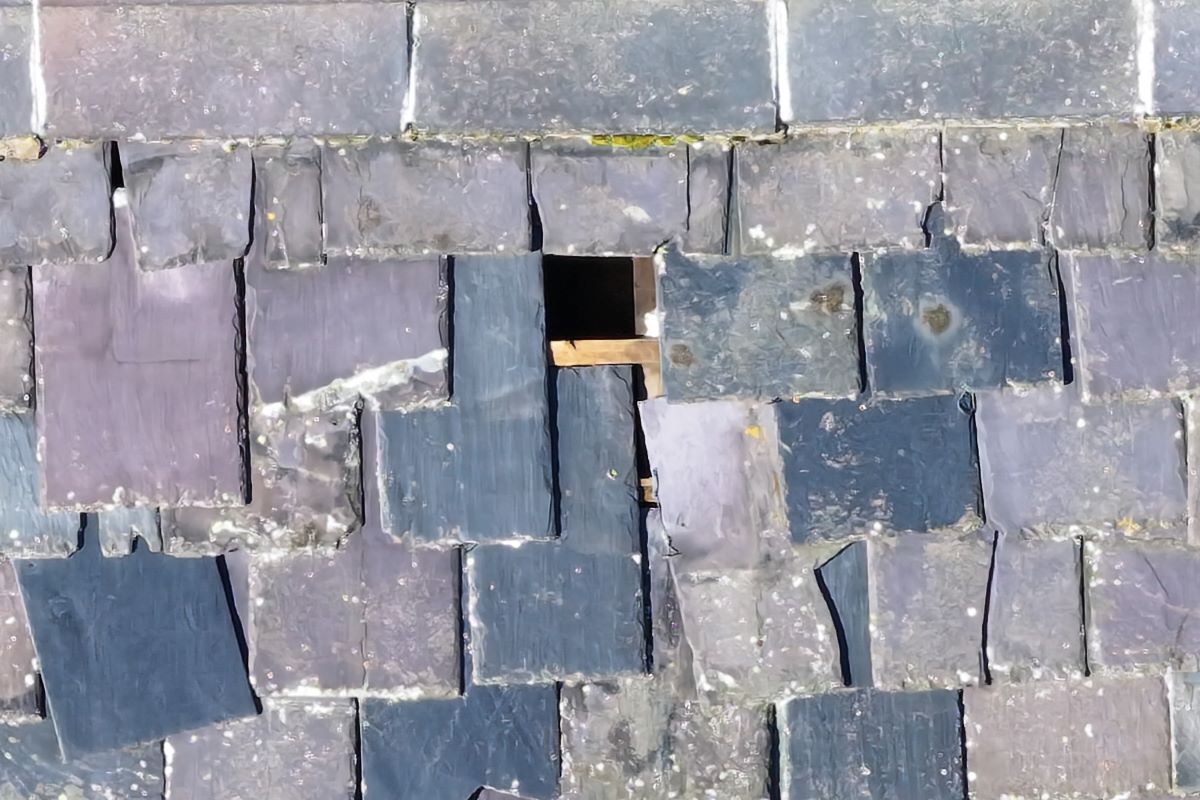
Figure 3. Image of grey slate roof at 50 metres in height. Zoom x10 - Our final drone is the DJI Mavic 3 – Thermal. It offers us the ability to add services in both the summertime and winter months. In the summer months, when we carry out a drone roof survey, if the property being surveyed has solar panels installed then we offer to analyse these solar panels for typical types of defects such as cracks, hot spots and string line defects. In the wintertime we assist property owners finding out where they are losing heat by offering thermal surveys.
Obviously, there are many more drones out in the marketplace, but these drones are our personal choice and work well for us.
What Defects Can Drones Pick Up?
I have been looking at roofs using drones now for nearly 3 years, and I constantly surprise even myself, with the capabilities of drones and the detailed imagery that we capture on behalf of our clients. Typically, the drones will capture the following:
- Damaged or clogged gutters with vegetation stopping the gutters flowing freely.
- Rotten facias, soffits and barge boards.
- Verges that require repointing.
- Slipped or broken slates or tiles that require securing or replacing.
- Ridge tile that requires relaying and repointing.
- Cracked or damaged flaunching, along with damaged pots on chimneys.
- Pointing on chimneys
- Displaced soakers and stepped flashings.
- Blocked valley gutters.
- Vegetation growing on the roof, IE moss and lichens.
- Nesting birds.
- Displaced aerials.
- Standing water and missing gravel on flat roofs.
- Debonding of asphalt felts from the substrate underneath on flat roofs
- Tears, rips and cracks in asphalt felts.
- Cut edge corrosion on trapezoidal roofing sheets.
- Damage to skylights.
- Missing fixings and discoloured fixings.
- Corrosion on both cable and fixings used on mansafe systems.
These are what I have typically found over the past 12 months, but very much depend on the roof being surveyed.
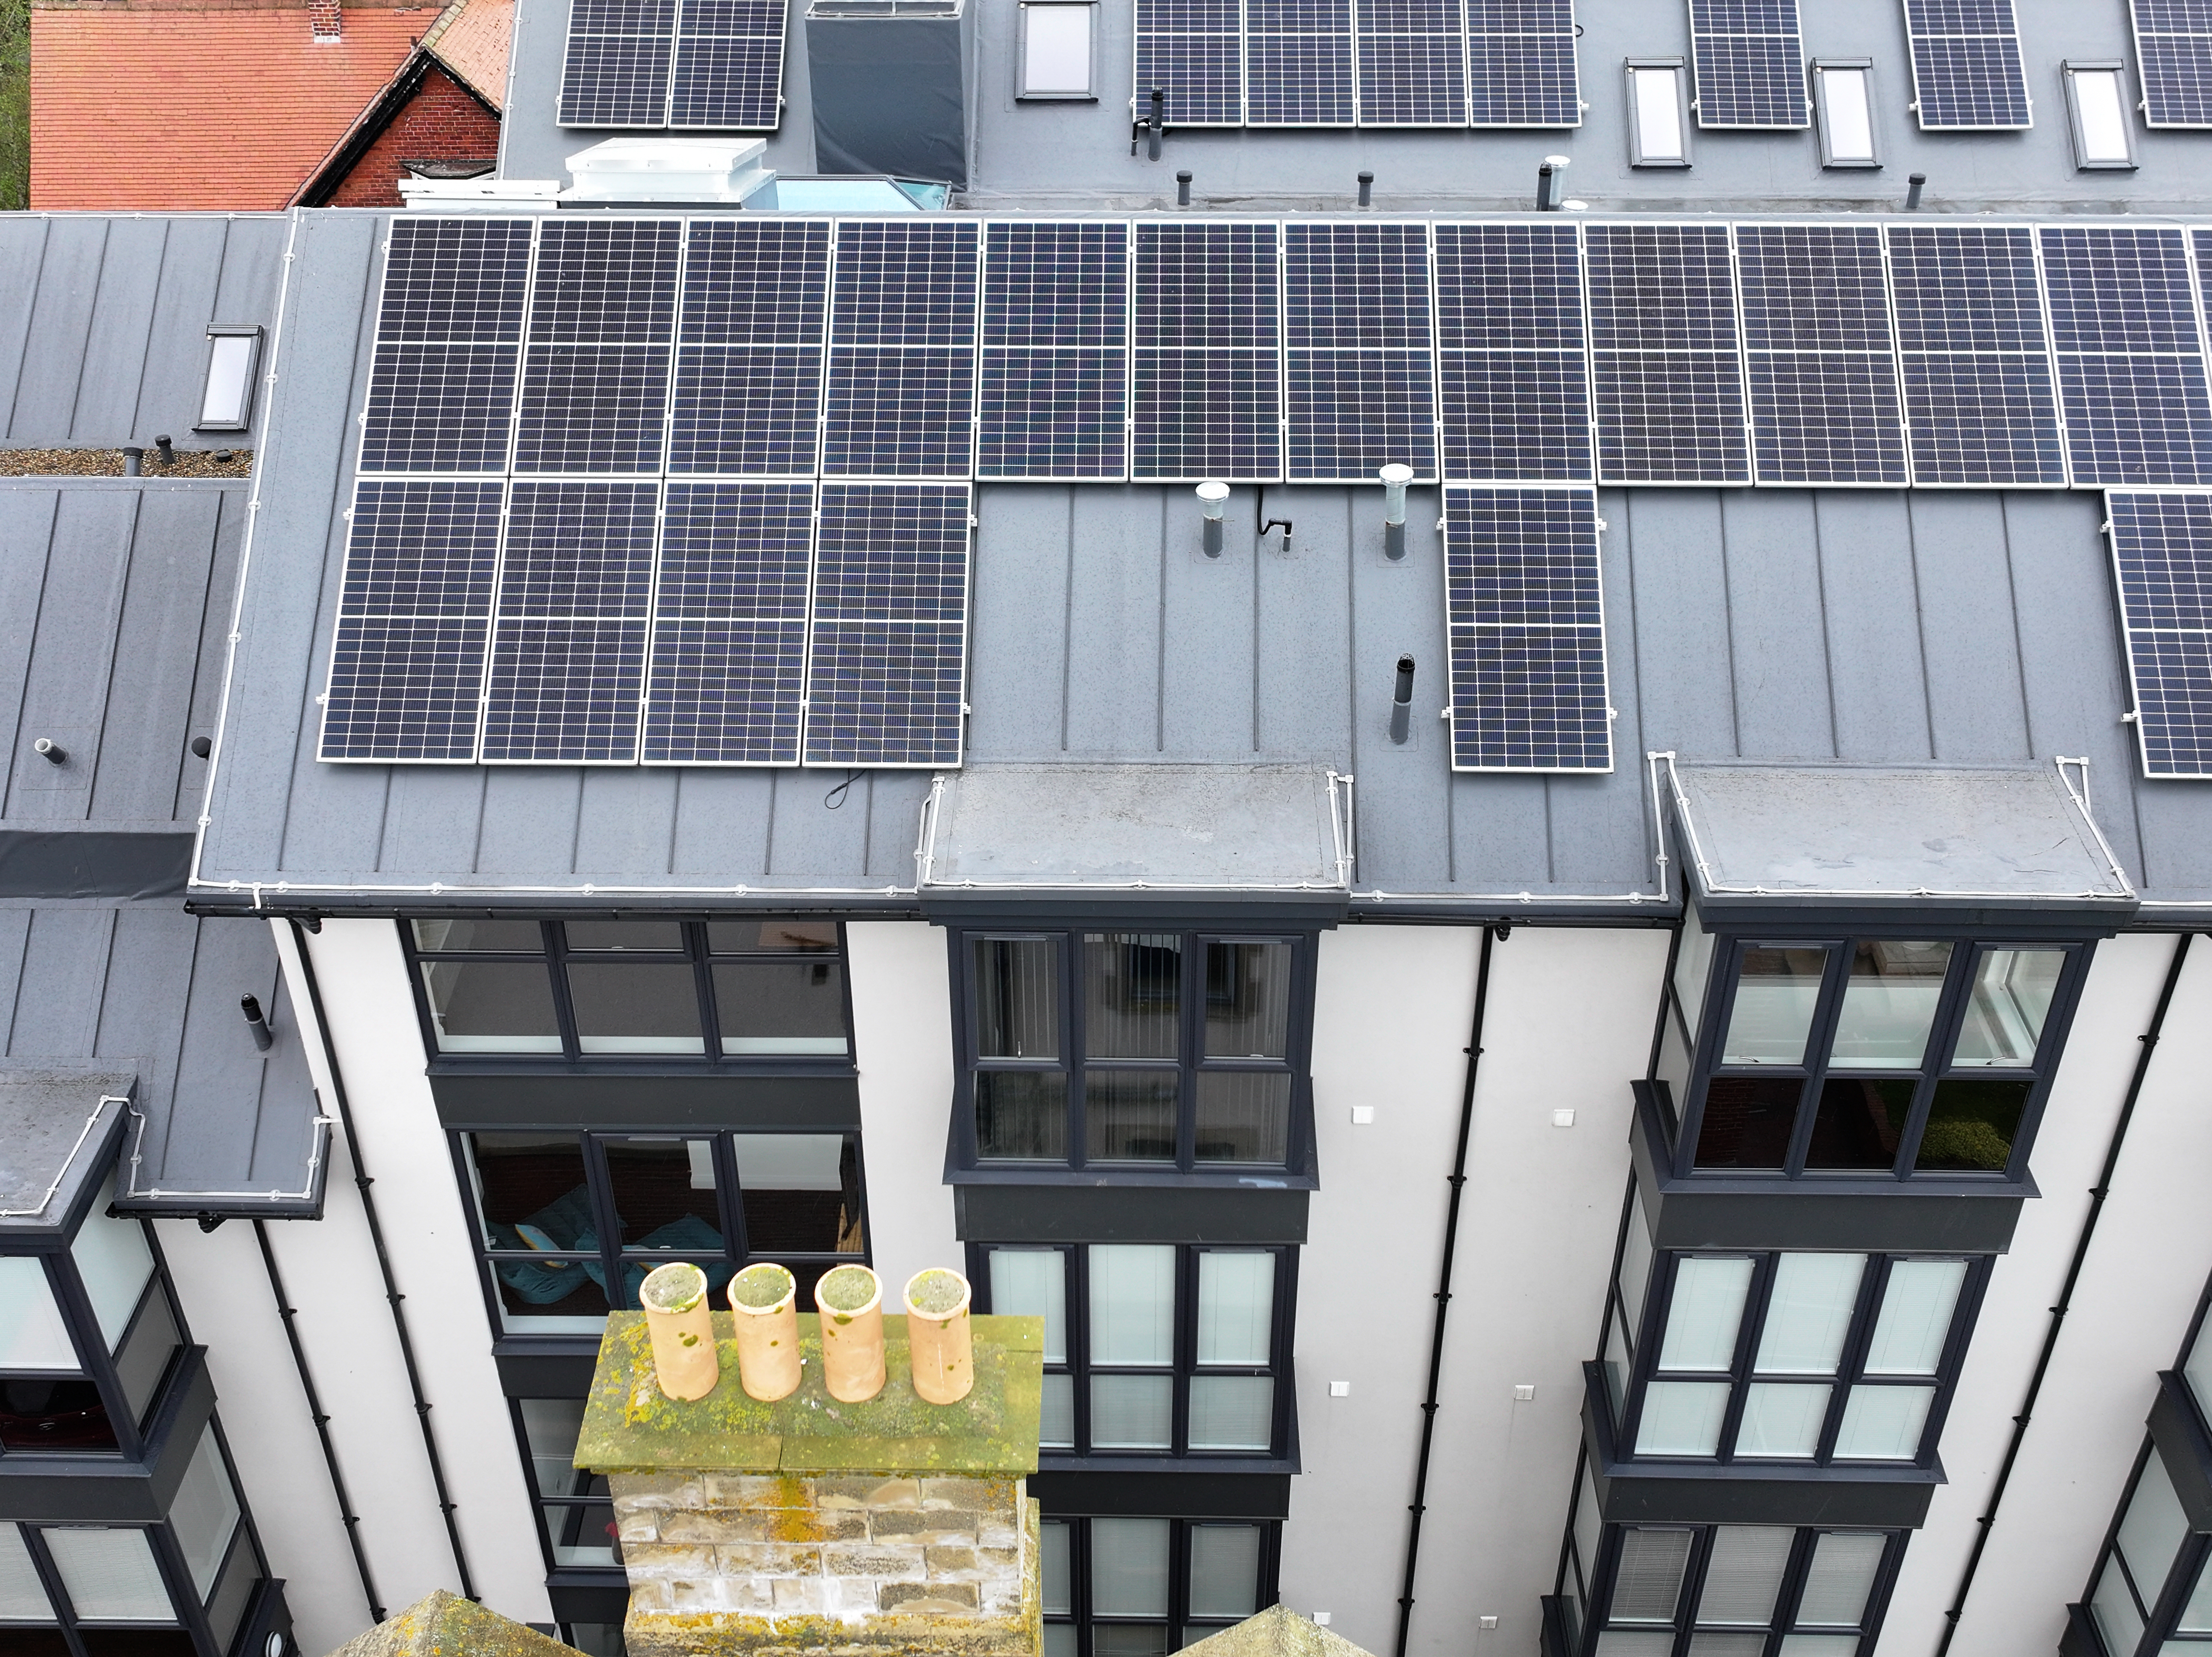 Figure 4. Image from a yearly roof survey and solar panel inspection
Step-by-Step Guide to Conducting a Drone Roof Survey
1. Compliance and Legal Requirements: Adhere to Civil Aviation Authority (CAA) regulations for drone operations in the UK. This includes:
- Operator Certification: Ensure that you or your pilot holds a valid GVC (General VLOS Certificate) or A2 CofC (A2 Certificate of Competency). This is especially important for drones over 250g.
- Drone Registration: All drones over 250 grams must be registered with the CAA.
- Flight Permissions: Obtain permission if flying near populated areas or restricted airspace.
- Insurance: Ensure comprehensive public liability insurance covers drone operations.
2. Pre-Survey Planning: Determine the scope of Survey
Before flying the drone, define the survey's objectives. Is the goal to check for leaks, cracks, or heat loss? Knowing this will help choose the right sensors and camera settings.
- Client Consultation: Discuss the client's requirements, including specific areas of concern.
- Site Assessment: Understand the roof's size, material, and any access restrictions. Personally, we use a mixture of Google Earth, Altitude Angel to know what class of airspace we are operating in, and we use Dronedesk to create our flight plans and keep on top of the dreaded paperwork.
3. Equipment Selection:
- Is this just a simple roof survey in a built-up area? If yes, we would use the DJI Mini 4 Pro
- Do you have any CAA permissions? For example, the A2COFC, GVC and CAA Operational Authorisation, if so, then you can use a larger drone but with restrictions.
- Does the survey have any other requirements such as a solar panel survey or thermal efficiency requirements. Then, we would use the DJI Mavic 3 Thermal, if one of these is out of your price range then you can pick up a good second-hand DJI Mavic 2 Enterprise Advanced off eBay for between £2000.00 - £2500.00.
4. Check Weather Conditions
Drones are highly susceptible to weather conditions. Conduct the survey only in favourable weather:
- Wind speed: Ensure the wind speed is below the drone’s operational limits (typically below 15-20 mph).
- Rain: Avoid flying in rainy conditions, as this can affect both drone operation and image quality.
- Sunlight: Bright sunlight can create glare and cast shadow, so consider the time of day and adjust camera settings accordingly.
5. Risk Assessment Method Statement and Flight Plan
The reason we are carrying out a drone roof survey is provide actionable data, in a safer method of working at the same time as trying to save the client some money. That said the operation still has to be carried out in a safe way. This first part of this is the RAMS.
6. Site Inspection
Perform a ground inspection of the site to identify obstacles such as trees, aerials, or power lines that could interfere with the flight. Google Earth is good, but it’s always worth a 10-minute walk around the property.
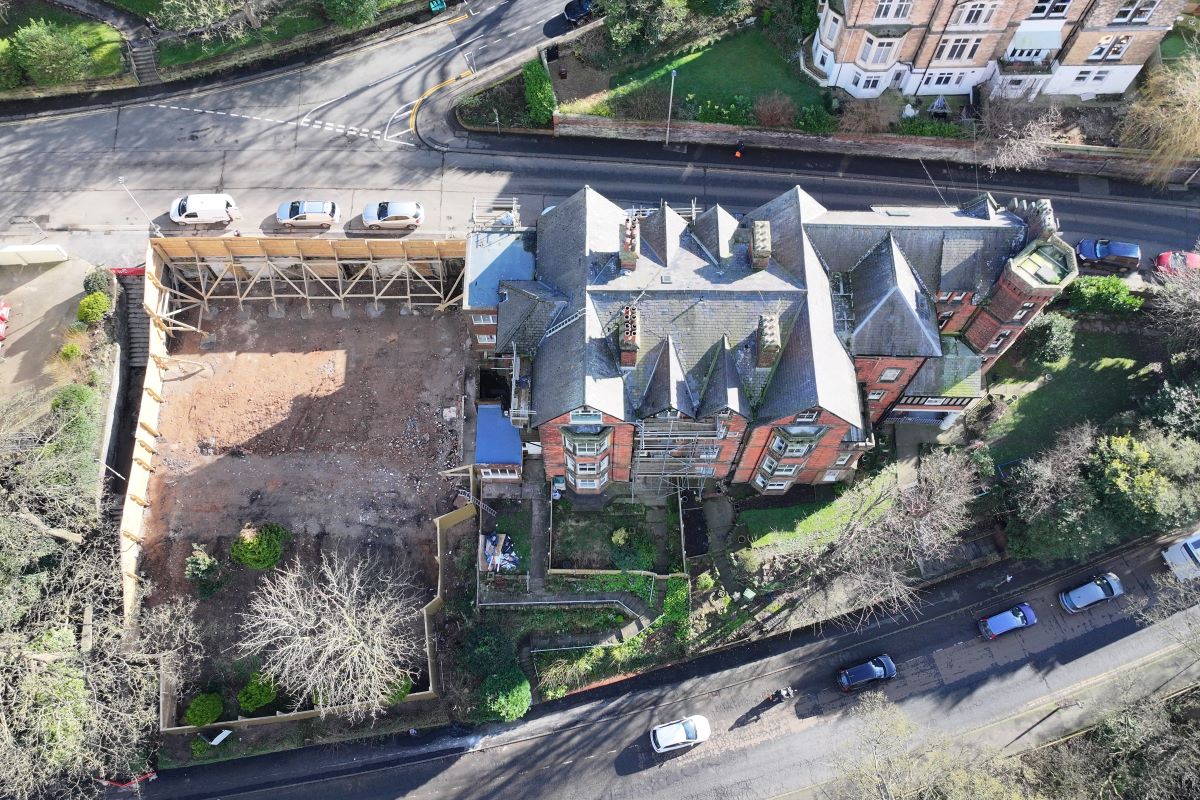
Figure 5. How many hazards can you see in the image?
Even though a Drone Roof Survey is a visual survey looking at the external structure of a roof, personally, I still like to look inside of the loft or attic, as it gives a great deal of information in how the roof in constructed. Does the roof have a sarking felt? What is the condition of the roof timbers?
I am also looking at the this point at pedestrian footpaths, roads, and are there birds flighting in the area. Where I live, the biggest threat I encounter on every drone roof survey is seagulls. Knowing this at the start of the flight means I take the high-altitude shots first! As more gulls circle and the drone by this point, has attracted the attention of every gull in a mile, I stay closer to the roof!
7. Safety Checks
Some of these are conducted before I leave home in the morning, and some are conducted on site:
- Firmware: At home, ensure the drone firmware is up to date.
- Battery Levels: Confirm that all batteries (drone and controller) are fully charged. We have 10 batteries with us that are fully charged at all times and also carry in car chargers, so we will never run out of batteries. This means your drone roof survey will not be rushed.
- GPS Signal: On site before take-off, we verify a strong GPS signal to maintain flight stability and accurate positioning.
8. Flying The Mission (The Exciting Part)!
If you are a surveyor or other property professional, who doesn’t fly drones, I would advise choosing the drone pilot carefully! Many drone pilots will set up a flight plan, which is generic in nature, for example they will set up a flight plan set at 50m height in a grid pattern. This imagery will be sub-standard, so definitely be very precise in the imagery that you require when communicating with your chosen drone pilot.
Typically, here's what I will do:
General Mission: The first image I will always take is from above and looking straight down (nadir) and captures all of the building, this helps to almost create a roof plan in your mind.
I will then move on to capturing the whole roof in a number of compass points, for example I will capture the image in oblique capturing the whole roof and the north elevation of the façades. Typically, this will be 8 images, so N, NE, E, SE, S, SW, W and NW.
The final part of the general mission is aimed at getting good images of all part of the roof. Imagine an up and over pitched roof of a terraced house, I will take a full image of each pitch of the roof. I do this because if a roof has 15 slipped or broken slates, you have to able to communicate this to your client, its easier when writing a report to have one pitch of a roof shown, with 15 red circles indicating the missing slates.
Detailed Mission: The purpose of a drone roof survey is to give you detailed actionable data, if you have generic imagery then you will have poor survey results. That is why we complete a manual flight, and this flight focuses in on the detail!
Previously, I mentioned about a roof having 15 slipped or broken slates, this is the moment to capture this detail for similar to image 2 and 3.
For example, if we are looking at a chimney, we will look at the flaunching and the pots on top in 4 directions, and we will do the same with the brickwork of the chimney, and the same with the stepped lead flashings and soakers. Just this 1 chimney will have 12 detailed photos.
Generally, a point to note is that I always like to work in systemic fashion, so I generally start with the facias & soffits, barge board or verges, gutters, any valleys or hips, the ridges, the chimney then the main body of the roof, this is then repeated for all sides of the roof.

Figure 6. Image of mortar fillet on a roof in Penzance.
Video Mission: Our clients are receptive to different types of imagery and forms of communication, so we always fly a video mission. The purpose of this gets our clients a quick source of information without having to understand a sometimes complex.
Personally, I like to do a number of short flights. These are a flight looking down on the gutters, A 360 degree flight around the property, a flight over the property from front to back, and one over the ridge line.
9. Post-Flight Data Review and Analysis of Imagery
After the flight, immediately download and review the captured data, this is done in a number of stages:
Editing: The most important part of the review of the imagery is the editing, this is crucial. We are often required to carry out our surveys at different times of the day, and detail within the imagery is of vital importance. One issue we often face is sunlight, the issue is that often the building will get in the way of the sun and cast a shadow, exactly where you are trying to inspect, and this means you lose detailed information. To overcome this, we use Adobe Lightroom to edit our imagery to show the highest level of detail. Just look at the before and after images.
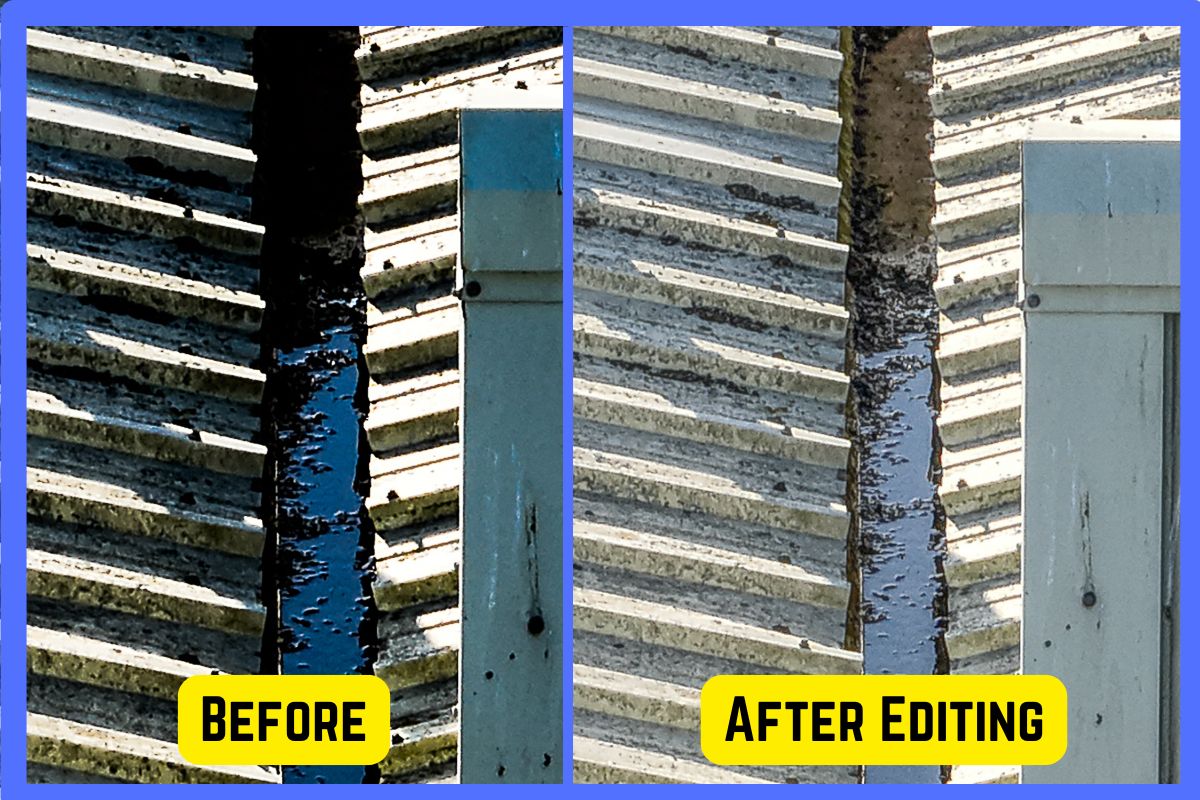
Figure 7. The Left image shows a valley gutter in shadow. The Right photo is the same photo, but after editing, showing much more detail such as Lichen growth on the sheets, standing water in the valley gutter, seagull guano, and corrosion in the steel that makes up the valley gutter.
- Imagery Analysis: I absolutely love this part and that is quite simply inspecting each and every photo for defects that can be found, it can be time consuming, but it is rewarding.
Personally, I use two software platforms to assist with the analysis of the imagery captured. The first is a platform called Skyline Surveyors and the second is called Scopito, however, there are other platform available, these are just my personal choices.
With both platforms, I can upload all the imagery and then highlight parts of the photo where a defect exists and then add an explanation what the defect is, how to rectify the issue and add a severity rating from 1-5.
Many of our reports will be sent on to roofing contractors, so our reports and imagery contain geolocations, I think this is really important to your client and also to the roofing contractor, so I would advise that you use a platform that has that ability, especially on larger roof. - Report Production: In the process of carrying out a drone roof survey I may capture anywhere between 80 and 1000 images (The largest was a set of 3671 images!), to keep the report length and file size down, the only images that are included the report are if they have been commented on. Some of the imagery captured may have no defects within the imagery.
The imagery that contains no defects is still send to client, but it is via a Dropbox link, so the client can still look at all of the imagery captured.
Another point noting, is if for example you are looking at a valley gutter, the length of an industrial unit, do you want the 30 photos of vegetation? Probably not! So, what I typically do is mark up an image like image 1 and will include 1-3 examples of that defect.
Once summaries, conclusions and any advice is written and finalised, the report is issued to the client with a link of all of the imagery that has been captured.
10. Client Review and Feedback
Surveys can contain many pages of detailed technical information, for many of us that have worked in the built environment sector for many years, we are used to reading these reports. However, our clients may not be able to, all they want to know is where that drip is coming from and how to stop it!
This is your time to shine by following up 24-48 hours to discuss their findings, this gives you the chance to ask the client if they understand the report.
The most important part of this follow-up is that you get the chance to ask the client about their experience of work with you and often you with either get glowing feedback, or at least constructive feedback.
A Final Note!
I just want to thank you for reading this far, when I started to write this article it was meant to be 2 or 3 pages and that was it! But I wanted it to be genuinely useful for all, so it grew in size.
For past 16 years, I have worked in construction as Project Manager, Design Manager, and also a Clerk of Works, I worked my way up from the ranks from a “trade”. I started Lithos-Skyline 3 years ago as a part-time hobby and now property inspections is my full-time job and love.
Quite genuinely, I hope you have found this article interesting and useful. If you have any queries, please feel free to email me.
Best wishes
Ricky Savage MCABE MRPSA MICWCI
https://skylinepropertysurveys.co.uk/
Richard@skylinepropertysurveys.co.uk
If you are considering buying or selling a home, you may find some of these services useful:

Mortgage Brokers
I need help getting a mortgage
Energy Performance Certificate
Energy Performance Certificates

Building Surveys
I want a local surveyor to do a Building Survey for me

Home Survey and valuation
I want a local surveyor to do a homebuyer survey and valuation for me
Structural Inspections
Find an expert to carry out a structural inspection
Structural Calculations
Find an expert to provide Structural Design Calculations

Invasive weeds report
If you are concerned that you may have Japanese Knotweed, or other nuisance plants.

Electrical Reports
Find an Electrician to produce an Electrical report (sometimes known as an Electrical Installation Condition Report - or EICR) for a property.